Quick Publisher
Publishing ACT3D files from native CAD files is a typical workflow for many organizations. Quick Publisher was developed to make creating a pipeline for this operation easier.

- Click the Quick Publisher button.
- Fill in each field.
- Click Create Only or Create, Deploy, & Start.

Quick Publisher Fields
Name
Enter a name for the pipeline to be created by the Quick Publisher. A unique and descriptive name is recommended.This is a required field.
Triggers
Select Directory Watcher for finding files on the local drive of the server or select Polling Directory Watcher for watching network drives.This is a required field.
Source Directory
Enter the source directory where Centro will find CAD files.
The directory is from the perspective of the server: c:\temp, for example, is the \temp directory on the server system where Centro is being run, which is not necessarily the system you are logged onto.
This is a required field.
Destination Directory
Enter the destination directory where Centro will create files.
The directory is from the perspective of the server: c:\temp, for example, is the \temp directory on the server system where Centro is being run, which is not necessarily the system you are logged onto.
This is a required field.
Use Extension
Enable Use Source Extension in Output Filenames to use the file extension in the output filename.
Filter
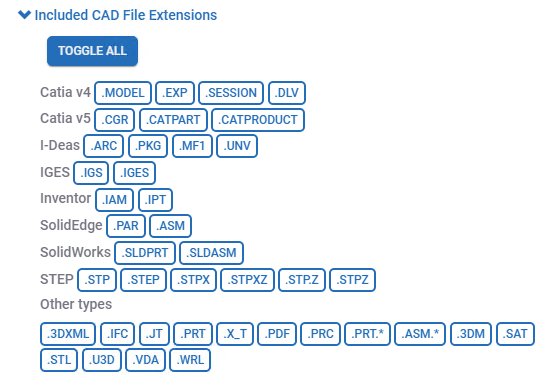
Specify which types of files to include; leave it blank to include all. Separate multiple entries with a semi-colon.Included CAD File Extensions
Select CAD extensions to supplement the Filter field. Click each extension to include.Watch sub-directories/Add existing files
Select the Watch sub-directories checkbox to include files from source folder subdirectories.
Select the Add existing files checkbox to include files files already present in the source directory (and subdirectory).
Note: These are both selected by default.
Open archive files
Select the Open archive files checkbox to extract files from zip, .gz, etc. and process them..
Note: This is not selected by default.
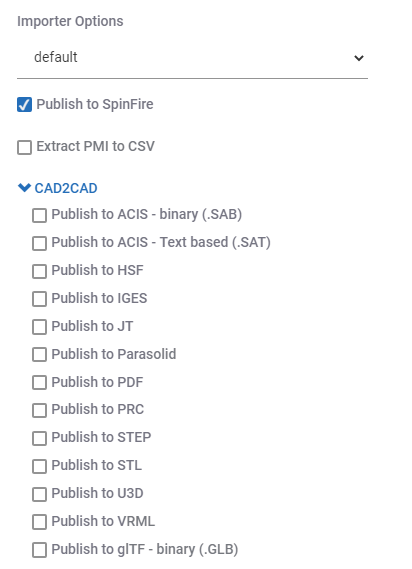
Importer Options
Select the Importer Options set to use to convert CAD files to ACT3D files..
Publish File Formats
Publish to SpinFire
Create .ACT3D files from native CAD files.
Import Options
Select a set of importer options to apply to the pipeline.
Public to ACIS - binary (.SAB)
Convert native CAD files to .SAB files.
Public to ACIS - Text based (.SAT)
Convert native CAD files to .SAT files.
Publish to HSF
Convert native CAD files to .HSF files.
Publish to IGES
Convert native CAD files to .IGES files.
Publish to JT
Convert native CAD files to .JT files.
Publish to Parasolid
Convert native CAD files to .X_T files.
Publish to PDF
Convert native CAD files to 3D PDF files.
Publish to PRC
Convert native CAD files to PRC files.
Publish to STEP
Convert native CAD files to STEP files.
Publish to STL
Convert native CAD files to STL files.
Publish to U3D
Convert native CAD files to U3D files.
Note: All are selected by default.
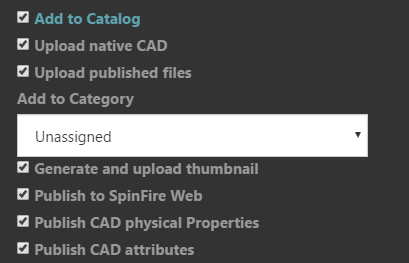
Catalog actions
Add to Catalog
Add the resource to the catalog.
Upload native CAD
Upload the native CAD file to the Catalog.
Upload published files
Upload an published file format (ACT3D, PDF, STEP, JT, STL) as a Catalog resource.
Add to Category
Automatically add files and their derivative files to a category.
Generate and upload thumbnail
Create a .PNG thumbnail of the native CAD file as visual representation of the CAD file in the Catalog.
Publish to SpinFire Web
Convert the native CAD file to hwf format to be viewed in SpinFire Web.
Publish CAD physical properties
Calculate the volume, surface area, bounding box, and center of mass. The results are added to the object in the Catalog.
Publish CAD attributes
Extracted meta data attributes are added to the object in the Catalog.
Note: All are selected by default.
Projects
Enter a project name or create a new project. Only users associated with the project can view items in the Catalog.
Multiple projects can be added.
This is a required field.
Related Topics
